
Difficulty: Medium-Hard
Privacy-conscious users will appreciate the ability to turn a Raspberry Pi into a personal VPN server, allowing you to access your home network securely from anywhere in the world. This is an excellent solution for remote workers and travelers. Connect your computer to not only access a secure private network on the go but also have LAN resources available to you like servers and printers. Use your mobile phone on the VPN for private browsing and peace of mind when on public wifi networks.
To start, install Raspberry Pi OS and update your system. Use a tool like PiVPN to simplify the installation of OpenVPN or WireGuard. Once configured, you’ll be able to connect to your home network through a secure, encrypted tunnel. This protects your data from snooping when using public Wi-Fi and allows you to access home devices remotely. Security and uptime are essential for this project, so choose hardware that can run reliably 24/7. Let’s go over what you will need and the MicroSD card recommend.
What You’ll Need:
- Raspberry Pi 4 or Raspberry Pi 5 (4GB RAM or higher)
- 64GB SanDisk Extreme MicroSD Card
- This is another project that you can get away with a 32GB card, but you may want to pair your VPN with Pi-Hole or other Internet related projects. So I would suggest using a 64GB to give you plenty of space.
- Static IP address or dynamic DNS service
- Ethernet cable (Hard wired is always preferred over wifi for connection stability, I even use a POE hat to limit the cables.)
- Open port on your router (e.g. port 51820 for WireGuard)
Best microSD Card for VPN Server on a Raspberry Pi:

64GB Micro SDXC Extreme Sandisk Memory Card (SDSQXAH-064G-GN6MN)
(Pricing as low as $21.70)
SanDisk Extreme 64GB microSDXC XAH Class 10 U3 A2 V30 UHS-1
How to Set Up your Raspberry Pi VPN server:
- Flash Raspberry Pi OS
- Download Raspberry Pi Imager and flash Raspberry Pi OS Lite for a mode without the UI (or regular Pi OS if you want the UI) to your microSD card.
- Verify the model Pi you are using for 32-Bit or 64-Bit.
- Insert the microSD card into the Pi and power it on.
- Download Raspberry Pi Imager and flash Raspberry Pi OS Lite for a mode without the UI (or regular Pi OS if you want the UI) to your microSD card.


- Connect to the Pi
- Either from your DHCP server or within the Raspberry Pi find your IP address.
- You can use
ip ain the terminal if you connect a keyboard and montior to your Pi. - SSH into the Pi with
ssh pi@<your-pi-ip>where you fill in your raspberry pi IP address. Or you can use an app called Termius which is a great tool.
- Setting up the Pi
- Next, update your Pi OS using
sudo apt-get update && sudo apt-get upgrade -y - We will set a Static IP address later in the installation process, but if you want you can set that now from your DHCP server.
- Reboot your Rasbperry Pi with
sudo reboot
- Next, update your Pi OS using

Installing PiVPN on your Raspberry Pi
- Installation
- Installing PiVPN is as easy as inputting
curl -L https://install.pivpn.io | bashand following on screen instructions! - You will need to hit “<OK>” several times in this process, I will not include all of them in the instructions but photos will be below.
- Select “<YES>” To adding the iPv6 setup.
- Installing PiVPN is as easy as inputting


- DHCP Reservation for your PiVPN
- If you already set up a static IP on your DHCP server just select “<Yes>”, otherwise you will choose “<No>”.
- Setting the Static IP Address within the installation wizard is very simple, photos will be below. Select “<YES>” to choose the Static IP Address based on the DCHP address you were given on the next page.
- A lot of this is very simple to set up. Just follow the on screen instructions.


Configure your PiVPN on your Raspberry Pi
- Local User to hold VPN Configuration
- Your username will be autoselected for you.
- Choose a VPN
- This instruction set will be for WireGuard. Not totally selected at random but with my research I found WireGuard to be faster and possibly more secure. The leading benefit is speed but there is also significantly less lines of code to WireGuard than OpenVPN. But choose your preference.
- Set Port Number
- 58120 will be default.


- DNS and Public IP Configuration
- Personally I use a Cloudflare custom DNS of 1.1.1.3 that blocks malicious sites and adult content natively. But you can use whatever your prefered DNS is.
- As noted in the first photo on the wizard, if you are using Unbound or another local DNS resolver make sure you set the DNS to “<PIVPN-is-local-DNS>”.
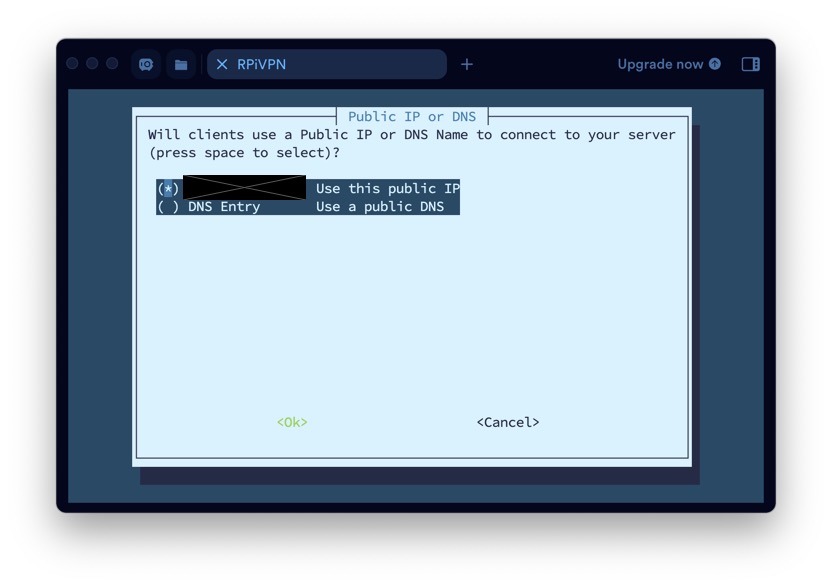
- Confirm these selections and verify your Public IP.
- You can choose instead to use a DNS entry that you update with a DNS A record from your own domain here as well. For this instruction set we will just use our Public IP address which I have redacted on the example photo.


Set up Client connection to your PiVPN on Raspberry Pi
This is where you will customize your PiVPN to your personal preferences more. Start by enabling the Unattended Upgrades and confirm the reboot of your Raspberry Pi.
- When your Pi boots up again, do the command
sudo pivpn addto give yourself your first client! - Give your first client it’s IP address or just enter through for an automatically configured IP.
- Name your first Client, I chose EBSVPNClient1 but you may want to be more descriptive with your naming scheme.
- PiPVN suggests that you use one client per device rather than per user like other VPN services. So a naming scheme like RJiPhone would be appropriate.
- Next enable the client with the command
pivpn -onand enter the name of your client.Yfor Yes. - Set up your client side connection now. On a phone you can download the WireGuard app for iPhone or Android or use the WireGuard client on a computer.
- Use the command
pivpn -qrto generate a QR code you can scan within the phone app to automatically set up on your mobile device.
- Use the command


Managing your PiVPN
At any point you can use the command pivpn -h to pull up a menu of all the commands you can use to interact with your PiVPN. This article will always be here with an up to date suggestion for the best memory card to use with Raspberry Pi and PiVPN as well as up to date instruction set. So, you can visit at any time if you need to set up your Pi again. There’s a chance your public IP address changes and you will need to reconfigure using the config file or set up again. You can use pivpn -c to view what clients are currently connected.
Get the best MicroSD cards for Raspberry Pi projects at our website! We carry several brands of cards that have been tested and work great with many Raspberry Pi models. For best results use an A2 rated MicroSD card for double the IOPS rating than A1 cards.