
It’s a good idea to clear the memory card for your camera once in a while. Whether it’s for your next vacation, a new photoshoot, or you just want to clear it for peace of mind, it’s nice to start fresh with a new memory card. So this is how to clear a memory card on a camera. There are 2 main ways to do it; you can clear the card in your camera, or clear the card from your computer.
Clear the memory card on your camera
Most cameras have a built-in “format” option in the settings. This will erase the memory card that is currently in the camera. Sometimes, the camera has two slots or even internal storage. So, make sure you are sure you want to format the card you have in. These are the 3 steps to clearing a memory card on a camera.
Step 1: Backup your data!
Be absolutely sure you can clear the memory card by backing up the data first! Never format a card without guaranteeing that all the pictures, videos, or other information are backed up first. Backup your memory card to your computer’s local hard drive, an external hard drive, or even a simple flash drive. EBS offers backup options for hard drives and flash drives on our website.
Step 2: Eject the memory card from the computer
Now that your data is backed up, it is safe to eject the card from the computer. Always properly eject the card first before removing it physically from your computer. Ejecting a flash drive, SD card, external drive, or other form of flash memory tells the computer to finish any read/write processes that may still be going on and safely end the connection to the external device. Now the computer will unmount the memory card.
On Windows 10/11
Within “File Explorer”, navigate to the panel on the left and find your memory card. Right click the list item and choose “Eject”. When the card is safe to remove the computer will give you a popup that says “Safe To Remove Hardware”.

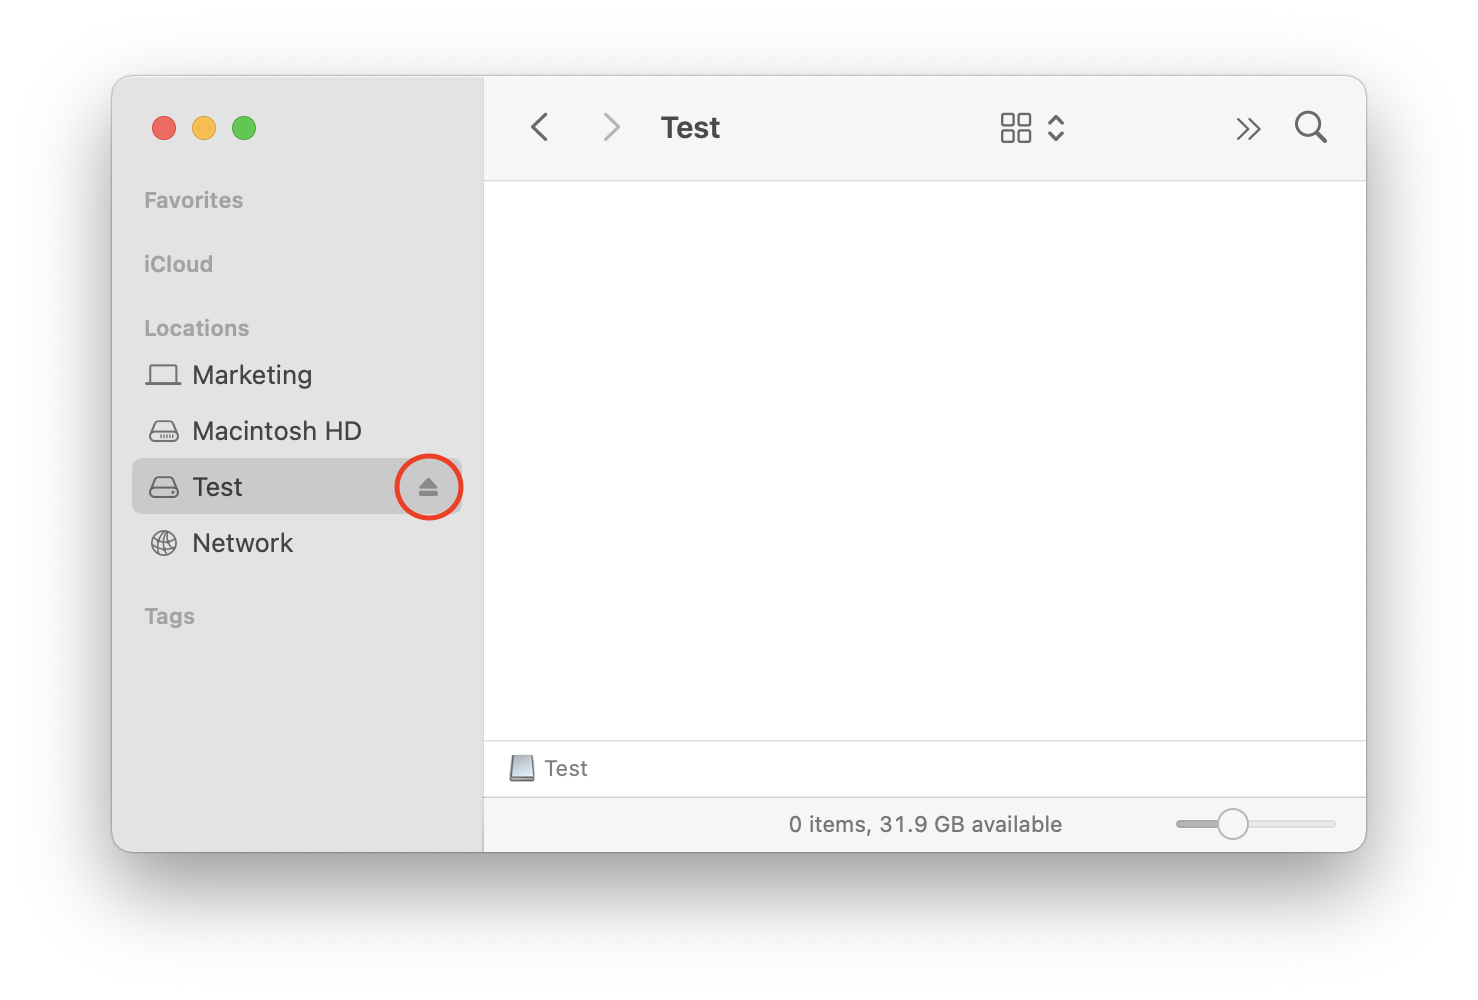
On Mac OS 10.X
Within “Finder”, navigate to the panel on the left and find your memory card. Next to the name of your memory card is the eject icon. It looks like a rectangle with a triangle on top. Click this icon, and when the card is safe to remove the list item will no longer be visible. Additionally, if the drive is visible on the desktop, you can right click the image and choose “Eject”. You can also do this same process to the list item in “Finder” if you choose.
Step 3: Clear a Memory Card on a Camera
If you have not backed up the memory card first, please do not follow through with this step. Everything on the memory card will be erased!
Insert the memory card back into the camera’s SD card slot. If your camera has more than one card slot, notate which slot it’s in. Within the camera menu, navigate to settings. The naming of the particular menu setting is different on each camera. But, it is usually named “Format Card”, “Erase Card”, or just “Format”. This setting is often towards the end or the bottom of the camera settings. Choose format, and follow the on-screen instructions. There will likely be a final warning, asking you are you sure you want to do this?
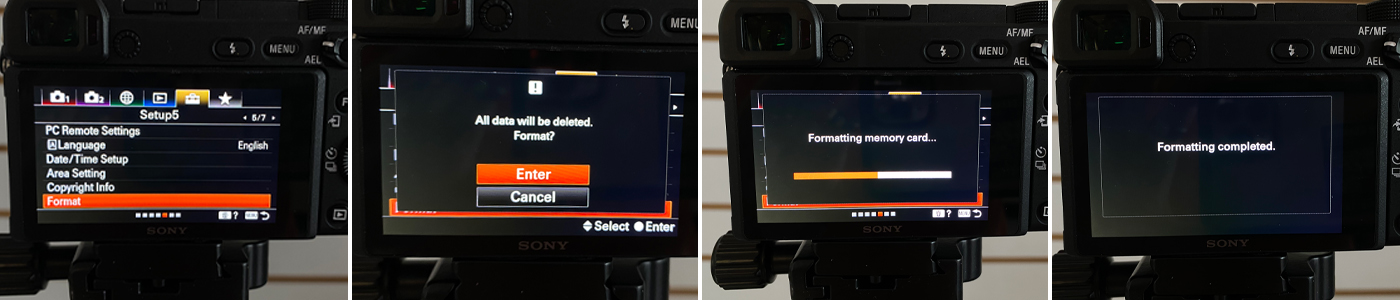
After choosing yes, all the memory on your card is formatted and the card may even be formatted to a new file format like exFAT or FAT32. Most cameras change the name of the card and default to “UNTITLED”. don’t miss this when you view it on your computer again.
Clear the memory card on your Computer
Some people would rather do the formatting on their computer. There are more options when using the computer software versus the camera. These are the steps you should take to clear a memory card on a computer.
Step 1: Always back up your memory card!
Always back up the data first! Guarantee all the pictures, videos, and other information are backed up beforehand. Backup your memory card to your computer’s local hard drive, an external hard drive, or even a simple flash drive. EBS offers backup options for hard drives and flash drives on our website. First, plug the SD card into the computer’s SD card slot. Then copy and paste the pictures and video to the chosen backup destination. Now that you’ve guaranteed the safety of your data, you’re ready for the erasing process.
Step 2: Clear a Memory Card on a Computer
This process is faster and easier. Most people like it for control and speed. Since your SD card is still plugged in, get the formatting done now. The process is different on Windows and Mac. here are the steps you will take.
On Windows 10/11
Within “File Explorer”, navigate to the panel on the left and find your memory card. Right click the list item and choose “Format…”. Next, a popup window appears. Choose the format setting that your camera works with or that you will need for your next project, a safe answer is exFat. Leave the default allocation size alone, and name the drive in the “Volume Label” field. Then, click “Start” at the bottom of the screen.

On Mac OS 10.X
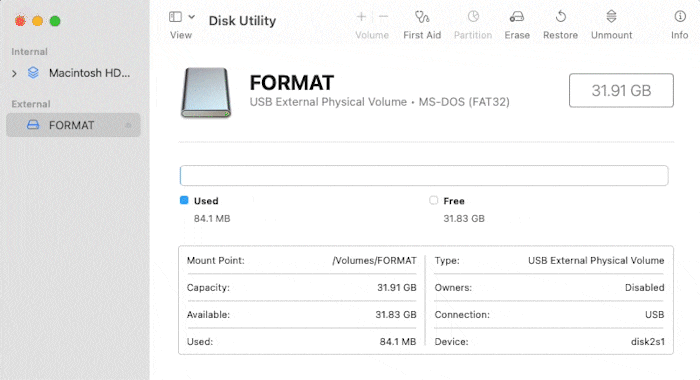
First, you will need to open “Disk Utility”, and use “Finder” to navigate to the Applications>Utilities folder. Or, press “Command” and “Spacebar” at the same time to open up “Spotlight search” and search for “Disk Utility”. Once you have the application open, select your drive in the left panel. In the top bar, choose “Erase”, a window will appear with options. Next, fill out the “Name” field, and set the “Format” option that works with your camera. Although some use Fat32, a safe answer is exFAT.
Step 3: Eject the memory card from the computer
Eject the drive from the computer, and return the SD card to the camera.
Done!
Your card has been formatted and you have successfully erased the data on the card. Now you have the full confidence that the card is at its maximum capacity, free from other images or data.